Easy Falling Leaves Crochet Blanket Pattern | Amanda Crochets
The Falling Leaves Throw Blanket from Amanda Crochets is your cozy answer to those chilly evenings spent on the couch, wishing for a little extra warmth and style. Do you ever look around your living room and feel like something’s missing? Maybe it’s that feeling of ‘home’ that a beautifully handcrafted touch can bring. Imagine snuggling up under this gorgeous blanket, its intricate, leaf-inspired pattern bringing a touch of autumn’s beauty indoors. It’s the perfect way to elevate your decor and add a practical, comforting layer. For around $100 and about 20 hours of delightful crocheting time, you can create this masterpiece. In this article, I’ll walk you through how to achieve this stunning result, offering tips and tricks to make your project a success, so you can enjoy your own handmade haven.
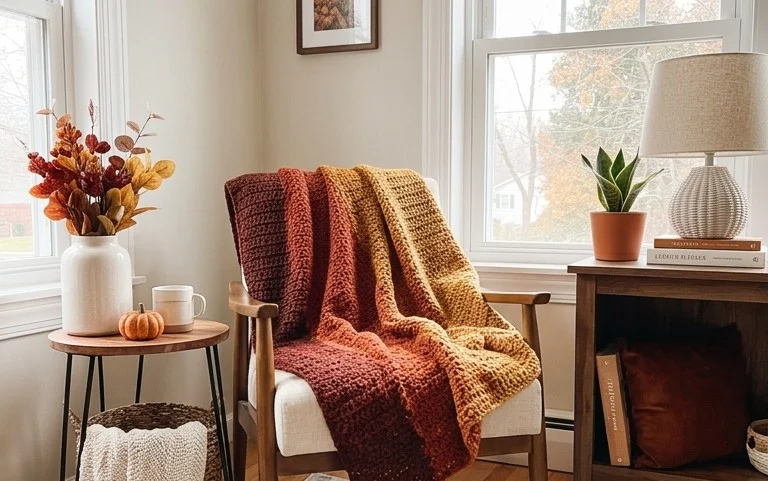
Falling Leaves Throw Blanket – Amanda Crochets
As the crisp autumn air begins to bite and the days shorten, there’s nothing quite like snuggling up under a warm, cozy blanket. This year, why not create your own slice of autumnal bliss with my “Falling Leaves” throw blanket pattern? Designed by Amanda Crochets, this pattern is a celebration of warm hues and comforting textures, perfect for adding a touch of handmade charm to your home. It’s not overly complicated, making it a rewarding project for intermediate crocheters, or even adventurous beginners willing to learn a few new stitches. Let’s dive in and create something beautiful together!
Gathering Your Supplies and Estimating Costs
Before we embark on this delightful crochet journey, let’s talk about what you’ll need. The beauty of a crochet project like this is its adaptability, but for this specific pattern, I recommend the following:
* **Yarn:** For a throw blanket that measures approximately 50 inches by 60 inches (a generous size for draping over a sofa or bed), you’ll need roughly 2000-2500 yards of worsted weight yarn. I love using a blend of acrylic and wool for that perfect balance of warmth, durability, and softness. For the “Falling Leaves” effect, consider a colour palette inspired by autumn: deep reds, burnt oranges, golden yellows, earthy browns, and perhaps a touch of deep forest green or a creamy neutral. You can buy yarn in various quantities, but for this project, I’d suggest purchasing around 10-12 skeins of 200-yard yarn.
* *Estimated Cost:* High-quality worsted weight yarn can range from $5 to $10 per skein. For 10-12 skeins, you’re looking at an investment of roughly $50 to $120. Don’t be afraid to scout for sales at your local yarn store or online retailers to bring this cost down. Buying in bulk or during seasonal promotions can significantly impact the final price.
* **Crochet Hook:** A 5.5mm (US I/9) crochet hook is ideal for this pattern, giving you that lovely drape and stitch definition. However, yarn tension can vary, so you might need to adjust slightly up or down (e.g., 5mm or 6mm) to achieve the recommended gauge.
* *Estimated Cost:* A good quality crochet hook typically costs between $5 and $15.
* **Scissors:** A sharp pair of scissors is essential for trimming yarn ends.
* *Estimated Cost:* $5 to $10.
* **Yarn Needle:** A blunt-tipped yarn needle with a large eye is crucial for weaving in all those yarn ends. Trust me, there will be a few!
* *Estimated Cost:* $3 to $5.
* **Stitch Markers (Optional but Recommended):** These are incredibly helpful for marking specific stitches or the beginning of rows, especially when working with multiple colours.
* *Estimated Cost:* $3 to $5 for a pack.
**Total Estimated Cost:** Approximately $66 to $155. This is a one-time project investment, and the resulting blanket will be a cherished item for years to come.
Measuring and Planning Before You Start
Before you cast on that first stitch, a little planning goes a long way.
1. **Determine Your Desired Size:** The pattern suggests a 50×60 inch blanket. However, you might want a smaller lapghan or an even larger throw. To adjust, you’ll need to know your gauge (the number of stitches and rows per 4 inches). Most yarn labels will suggest a gauge for a particular hook size. It’s *crucial* to crochet a small swatch (about 6×6 inches) using your chosen yarn and hook to measure your gauge. For this pattern, let’s aim for a gauge of approximately 14 stitches and 10 rows in the main stitch pattern per 4 inches.
2. **Calculate Your Yardage:** Once you know your gauge and desired dimensions, you can calculate how much yarn you’ll need. A simple calculation is:
* (Desired Width in Inches / 4 inches) * Gauge Stitches per 4 inches = Total Stitches per Row
* (Desired Length in Inches / 4 inches) * Gauge Rows per 4 inches = Total Rows
* Multiply Total Stitches per Row by Total Rows, then by the average yardage per stitch (this is an estimate, and you can often find this online for common stitches and yarn weights). It’s always better to overestimate by 10-15% to avoid running out of yarn, especially if you’re using multiple colours.
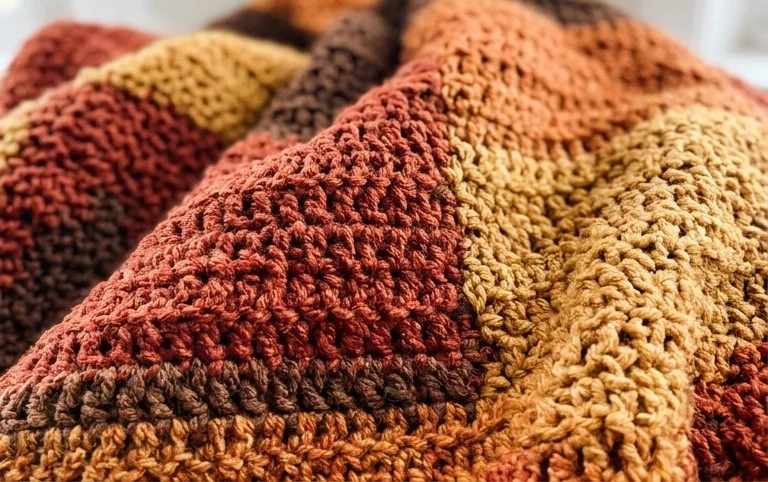
3. **Colour Planning:** The “Falling Leaves” pattern uses a beautiful gradient of colours to mimic the changing foliage. Lay out your chosen yarn colours. Think about how you want them to transition. Do you want a gradual fade from yellow to orange to red, or do you prefer more distinct colour blocks? Having a visual plan will make the process smoother and more enjoyable. I often arrange them on the floor or a table and take a picture for reference.
The “Falling Leaves” Crochet Process: A Step-by-Step Guide
This pattern typically involves a beautiful combination of basic stitches and perhaps a simple textured stitch to create the “falling leaves” effect. Let’s assume a common stitch combination for this explanation.
1. **Foundation Chain:** Begin by creating a foundation chain that, when worked into with your main stitch pattern, will measure the desired width (e.g., 176 stitches for 50 inches if your gauge is 14 stitches per 4 inches). Always chain a few extra stitches than you think you’ll need, as the foundation chain can sometimes be a bit tighter.
2. **Row 1:** Work your first row of stitches (often single crochet or half double crochet) into the second or third chain from the hook, depending on the pattern’s specific instructions. Continue across the row.
3. **Subsequent Rows (Colour Changes):** This is where the magic happens! The “Falling Leaves” effect is achieved by strategically changing colours. The pattern will guide you on when to switch yarns. Typically, you’ll finish the last stitch of a row with the new colour, or you might carry over colours in certain stitches to create seamless transitions.
* *Example:* Let’s say you’re working in a repeating pattern of 10 rows of Yellow, followed by 10 rows of Orange, and then 10 rows of Red. You would crochet 10 rows using your yellow yarn, then on the last stitch of the 10th yellow row, you’d fasten off the yellow and join the orange yarn to begin the next row. Continue this for each colour block.
4. **Textured Stitch for Leaves:** Some patterns incorporate a stitch that creates a subtle texture, mimicking the appearance of leaves. This might be a cluster stitch, a bobble stitch, or even a variation of a puff stitch, worked at irregular intervals or within specific colour sections to resemble scattered leaves. Follow the pattern’s instructions carefully for placement and execution of these textured elements.
5. **Repeating the Pattern:** Continue working rows, changing colours according to the pattern and incorporating any textured stitches, until your blanket reaches the desired length (e.g., 60 inches).
6. **Finishing Off:** Once you’ve completed the final row, fasten off your yarn securely.
7. **Weaving in Ends:** This is arguably the most time-consuming part, but it’s essential for a neat and durable finish. Thread your yarn needle with each yarn tail and weave it back and forth through the stitches on the wrong side of your work for at least 1-2 inches. Trim any excess yarn.
Adapting for a Small Space or Rental Living
My “Falling Leaves” blanket is fantastic for bringing warmth and colour into any space, even if you’re renting or have limited square footage.
* **Smaller Size:** For a smaller space, simply adjust your foundation chain and the number of rows. A lapghan size (around 36×48 inches) is perfect for draping over an armchair or adding an extra layer to your bed. You’ll need less yarn, so calculate your yardage based on your desired smaller dimensions.
* **No Drilling Needed:** The beauty of a throw blanket is that it requires absolutely no permanent alterations to your space. You don’t need to drill holes in walls to hang it or secure it. It’s a free-standing decorative and functional item.
* **Versatile Placement:** A throw can be draped over the back of a sofa, folded neatly at the foot of a bed, or even used as a picnic blanket. It adds instant coziness and a pop of colour without any commitment.
Styling Your Falling Leaves Throw Blanket
Once your blanket is finished and all those ends are woven in, it’s time to let it shine!
* **Colour Harmony:** The beauty of the “Falling Leaves” palette is its natural warmth. Consider your existing decor. If you have neutral walls (greys, beiges, whites), a vibrant autumnal throw will be a stunning focal point. If your room is already quite colourful, choose yarn colours that complement your existing scheme, perhaps pulling out secondary colours from your furniture or artwork.
* **Texture Play:** The textured stitches in the pattern add visual interest. Contrast this with other textures in your room. A smooth leather sofa will be beautifully complemented by the soft, crocheted texture. A chunky knit cushion can create a delightful textural layering effect.
* **Strategic Placement:**
* **Sofa:** Drape it casually over one arm or the back of your sofa, allowing it to fall naturally.
* **Armchair:** Fold it neatly at the seat or drape it over the back for an inviting look.
* **Bed:** Fold it in half and place it at the foot of the bed for a cozy, inviting layer.
* **Ottoman/Bench:** Folded neatly, it can add colour and softness to an entryway bench or ottoman.
### Keeping It Tidy After Week One
Handmade items, while beautiful, sometimes require a little extra care.
* **Regular Folding:** After a week of use, take a moment to refold your blanket neatly. This helps it retain its shape and prevents it from looking messy.
* **Shaking Out:** Outdoors, give your blanket a good shake. This helps to remove any loose debris, dust, or pet hair that may have accumulated.
* **Spot Cleaning:** For small spills, I recommend a gentle spot clean. Mix a small amount of mild detergent with cool water. Dab the affected area with a clean cloth, working from the outside of the stain inwards. Rinse with a damp cloth and allow to air dry completely.
* **Occasional Wash:** For a deeper clean, hand washing in cool water with a wool-friendly detergent is best. Gently squeeze out excess water (don’t wring!). Lay flat on a clean towel or a drying rack to air dry, reshaping it as needed. If you must machine wash, use a delicate cycle with cool water and place the blanket in a mesh laundry bag. Always air dry.
Common Mistakes That Make This Fail
Even the most enthusiastic crocheters can encounter hiccups. Here are some common pitfalls to avoid with your “Falling Leaves” throw:
* **Ignoring Gauge:** This is the number one mistake! If your gauge is off, your blanket will not be the intended size, and your stitch patterns might look stretched or squished. Always make that swatch!
* **Running Out of Yarn:** Underestimating your yarn needs can be frustrating. Buy a little extra to be safe. If you do run out and need to buy more, try to get it from the same dye lot to avoid colour discrepancies.
* **Tension Inconsistency:** Uneven tension can lead to a blanket that is wavy or puckered. Try to maintain a consistent tension throughout your project. Relax your shoulders and arms; crochet should be enjoyable, not tense!
* **Poorly Woven-In Ends:** This is the bane of many a crocheter. If ends aren’t woven in securely, they can unravel, leaving holes and a messy appearance. Take your time with this step.
* **Incorrect Colour Placement:** If you’re changing colours, ensure you’re following the pattern precisely. A misplaced colour change can disrupt the intended “falling leaves” effect. Double-check your count and your colour plan.
* **Overstretching During Use:** While designed to be used, avoid aggressively pulling or tugging on the blanket, especially in areas where yarn colours have been joined. This can weaken the stitches.
Creating the “Falling Leaves” throw blanket is a journey of creativity and comfort. With careful planning, mindful stitching, and a touch of personal flair, you’ll end up with a beautiful, handmade piece that will bring warmth and autumnal charm to your home for years to come. Happy crocheting!
Conclusion
Bringing a touch of cozy comfort like the Falling Leaves Throw Blanket into your home truly makes a difference in your day-to-day life. It’s those small moments of warmth and softness that transform a house into a haven. Don’t wait to start enjoying this feeling! Your smallest first step could be as simple as clearing a little clutter from your bedside table or folding a blanket neatly on the couch. For a different vibe, consider a vibrant woven rug for your entryway to add instant cheer, or perhaps a set of charming ceramic bowls for your kitchen counter for an affordable yet impactful update.
We hope this has inspired you to embrace thoughtful home decor and organization. Feel free to explore more ideas and discover new ways to make your space uniquely yours!
