Quiet Time Bins for Year Olds: Easy Ideas
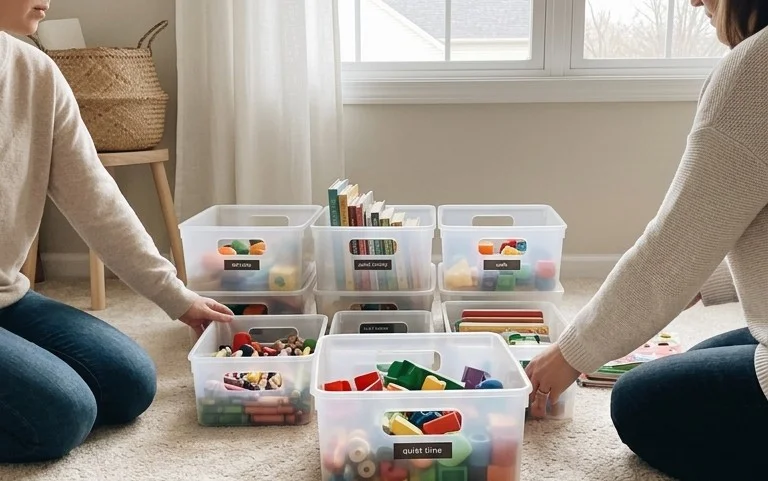
The magic of quiet time bins for 3-year-olds is a game-changer for busy mamas like you and me! Are you tired of the mid-afternoon scramble, the endless requests, or the scattered toys that seem to multiply overnight? I know my house often feels like a toy explosion zone, and finding a moment of peace can feel impossible. Imagine this: instead of chaos, you have a designated corner with beautifully organized bins, each holding a delightful activity that captivates your little one independently. For a small investment, usually under $20 per bin, and taking just a few minutes to assemble, you can create pockets of calm that transform your afternoons. In this article, I’ll share exactly how to create these enchanting bins, what goes inside, and how they’ll give you back precious moments for yourself, all while fostering your child’s creativity and independence. Let’s make quiet time truly magical!
The Magic of Quiet Time Bins for 3 Year Olds – Mama MeganAllysa
As a mom of a spirited three-year-old, I’ve learned that those precious moments of independent, calm play aren’t always a given. In fact, they can feel like chasing a unicorn sometimes! But I’ve discovered a game-changer that has brought more peace to our home than I ever thought possible: quiet time bins. This isn’t about rigid schedules or forcing your child to sit still. It’s about creating engaging, self-directed activities that naturally encourage focus and a sense of calm, giving both your child and you a much-needed breather. If you’re looking to cultivate more independent play and sanity in your home, join me as we dive into the magic of quiet time bins!
What You Need and Roughly What it Costs
The beauty of quiet time bins is that they can be incredibly budget-friendly. The core elements are storage and the items to fill them.
Storage:
* Plastic Bins with Lids: Look for clear or opaque bins. Many come in stackable sets. For a starting point, I recommend 4-6 bins. Popular brands like Sterilite or Iris offer sets for around $20-$40 for a set of 4-6 medium-sized bins (approximately 12″ x 8″ x 6″).
* Fabric Bins or Baskets: If you prefer a softer look, fabric bins can be great. You can find sets of 3-4 for about $30-$50. Consider brands like Amazon Basics or various home goods stores. These are particularly good for small spaces or rentals.
Fillers (for 4-6 bins, depending on the theme):
* Sensory Materials: Dried beans (black beans, pinto beans), rice, pasta shapes, kinetic sand, pom-poms, water beads (use with caution and supervision). A 5lb bag of dried beans or rice is usually under $5. A 1lb container of kinetic sand is around $10-$15.
* Small Toys: Figurines (animals, people), small cars, building blocks (Duplo, Mega Bloks), mini puzzles, linking toys. You can often find these in bulk sections of craft stores, thrift stores, or dollar stores for $5-$10 per bin.
* Craft Supplies: Chunky crayons, washable markers, large safety scissors, construction paper, pipe cleaners, googly eyes, glue sticks. Again, dollar stores and craft store sales are your friends here. Budget around $5-$10 per bin for these.
* Books: Board books or paperback picture books.
* Lacing Beads or Lacing Cards: A set can be found for $10-$20.
Total estimated cost for setting up 4-6 bins: You can start anywhere from $75 to $150, depending on how much you already have and the quality of storage you choose. The key is that these are investments that will be used repeatedly.
How to Measure and Plan Before You Start
Before you rush out and buy everything, a little planning goes a long way.
Space Assessment:
* Where will these bins live? Do you have a dedicated play area, a corner of the living room, or shelves in your child’s bedroom? Measure the available space. For example, if you have a bookshelf that is 30 inches wide and 10 inches deep, you know you can fit bins that are roughly 10-12 inches wide and 8-10 inches deep.
* Consider stackability. If floor space is limited, stackable bins will be your best friend. Ensure you have enough vertical clearance.
Child’s Interests:
* What does your three-year-old *love*? Are they obsessed with dinosaurs, cars, fairies, or building? Tailor your bin themes to their current fascinations. This is the secret sauce to engagement.
* What are their developmental stages? Are they working on fine motor skills (lacing, scooping)? Cognitive skills (puzzles, matching)? Sensory exploration?
Theme Brainstorming:
* Think about variety. Aim for different types of play. Some ideas:
* Sensory Bin: With dried beans and small toys.
* Building Bin: With Duplo blocks or Magna-Tiles.
* Art Bin: With crayons, paper, and stickers.
* Fine Motor Bin: With lacing beads and pegboards.
* Pretend Play Bin: With small figurines and props.
* Consider rotating themes. You don’t need to fill every bin every week. Having a few pre-made and rotating them keeps things fresh and exciting.
A Clear Numbered Walkthrough of the Process
Let’s get these bins ready!
1. Gather Your Storage: Purchase or find your chosen bins. If using plastic bins, decide if you want to label them with words, pictures, or both. For younger kids, picture labels are fantastic.
2. Choose Your Themes: Based on your planning, select 4-6 themes for your initial bins.
3. Source Your Fillers and Activities:
* For sensory bins, purchase your chosen filler (beans, rice, kinetic sand).
* For building bins, gather age-appropriate blocks.
* For art bins, collect paper, crayons, markers, and safety scissors.
* For fine motor bins, look for lacing beads, threading toys, or small objects to sort.
* For pretend play, gather small figurines, toy animals, or dollhouse accessories.
4. Assemble the Bins:
* For sensory bins, fill the bin about 1/3 to 1/2 full with your chosen filler. Add 5-10 small, coordinating toys. For example, in a dinosaur bin, add plastic dinosaurs, small rocks, and perhaps some green pom-poms.
* For building bins, fill with enough blocks for a satisfying building session.
* For art bins, include a pack of paper, a set of crayons or markers, and a few other craft items like stickers or glue sticks.
* For fine motor bins, include a good quantity of lacing beads and a string, or a threading board with pegs.
* For pretend play, pack in a few characters and a few small props that go with them.
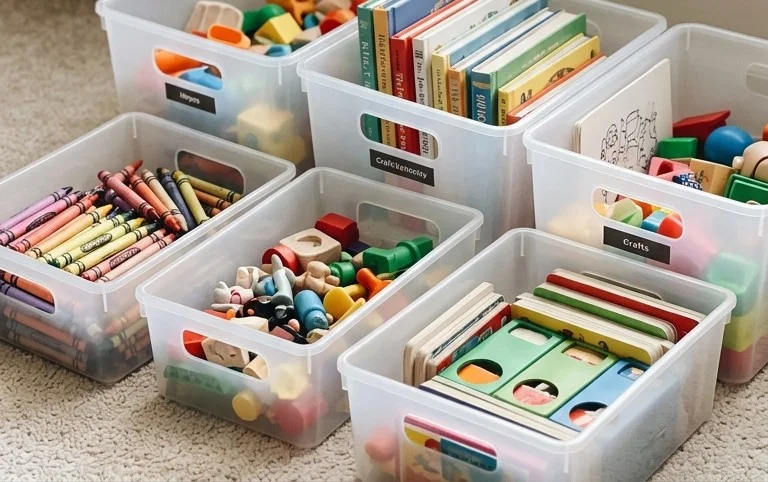
5. Label Your Bins: Clearly label each bin with its theme. This helps both you and your child identify what’s inside.
6. Find a Designated Space: Place your bins in their pre-determined location. If stacking, arrange them neatly.
Styling Notes: Colour, Texture, and Placement
Making quiet time bins look good, even when in use, is all about thoughtful styling.
Colour Palette:
* Consider a cohesive colour scheme for your bins themselves. Neutral tones like beige, white, grey, or muted pastels can help them blend seamlessly into your decor. If your child has strong colour preferences, you can incorporate those too, but aim for a balanced look.
* Within the bins, mix colours for visual interest. For a sensory bin, using multi-coloured dried beans can be lovely. For an art bin, a rainbow of crayons is always appealing.
Texture:
* Introduce a variety of textures to make the bins more engaging. The smoothness of plastic beads, the graininess of rice, the softness of pom-poms, the roughness of small stones in a sensory bin.
* For fabric bins, the texture of the material itself adds to the overall feel.
What to Put Where:
* Sensory bin fillers (beans, rice) should go at the bottom to create a base.
* Small toys can be nestled into the filler or placed on top for easy discovery.
* For art bins, keep paper accessible, perhaps rolled or fanned out slightly. Crayons and markers can be in a small container or laid out.
* In fine motor bins, ensure lacing beads and strings are easily found.
* Arrange bins neatly. If they are on shelves, ensure they are pushed in and not overflowing. If they are on the floor, try to keep them upright.
How to Adapt it for a Small Space or a Rental Where You Cannot Drill
Don’t let space limitations or drilling restrictions stop you!
Small Space Solutions:
* Vertical Storage: Utilize wall space with freestanding bookshelves or cube storage units. These are perfect for stacking bins.
* Under-Furniture Storage: Use shallow, lidded bins that can slide under sofas or beds.
* Ottomans with Storage: These double as seating and storage, hiding bins away discreetly.
* Door Organizers: Some fabric pocket organizers can hold smaller items like crayons or small toys, which can then be placed *into* a quiet time bin.
Rental-Friendly Options:
* Freestanding Shelving: Opt for sturdy, freestanding shelving units that require no drilling.
* Stackable Bins: Clear plastic bins with lids are excellent as they protect contents and can be stacked high.
* Fabric Bins and Baskets: These are inherently rental-friendly and can be placed on existing shelves or on the floor.
* Command Hooks and Strips: For hanging smaller bags of craft supplies or even small bin liners, adhesive hooks are a lifesaver.
How to Keep it Tidy After Week One
The initial setup is one thing, but maintaining tidiness is key for long-term success.
* The “Clean Up” Transition: Before introducing a new bin, or at the end of a play session, do a quick “tidy up” together. Have a designated bin for “bin leftovers” that gets emptied back into the main bin before the next session.
* One Bin at a Time Rule: Emphasize that only one bin is to be used at a time. This prevents toys from migrating between bins and creating chaos.
* Regular Purging: Every few weeks, take a bin out and sort through it. Discard broken items, put away stray pieces that belong elsewhere, and refresh the filler if needed.
* The “Bin Refresh”: Once a month, swap out 1-2 bins for new themes or replenish the contents of existing ones. This keeps engagement high and provides an opportunity to tidy up.
* Involve Your Child: At three years old, they are capable of helping! Make clean-up part of the routine. “Let’s put the dinosaurs back in their bin!” is a simple, effective phrase.
Mistakes That Make This Fail
Even with the best intentions, some common pitfalls can derail your quiet time bin efforts.
* Over-Complication: Trying to create elaborate, multi-step activities will likely lead to frustration for both you and your child. Keep it simple and age-appropriate.
* Too Many Small Parts: Especially with younger three-year-olds, a bin filled with tiny objects can be overwhelming and a choking hazard. Keep the quantity of small items manageable and appropriate for your child’s fine motor skills and chewing habits.
* Not Engaging Their Interests: If the theme is something your child couldn’t care less about, they won’t engage. It’s better to have fewer bins that are a hit than many that are ignored.
* Lack of Rotation: Using the exact same bins with the exact same contents for months on end will lead to boredom. Rotation is your friend!
* Unrealistic Expectations: Quiet time isn’t always silent meditation. There will be moments of chatter, occasional mess, and sometimes, a child who just isn’t interested in the bin that day. That’s okay. The goal is to encourage independent play, not enforce perfect stillness.
* Not Childproofing Your Fillers: Be mindful of potential hazards. Avoid small items that can be easily swallowed if your child still puts things in their mouth. Always supervise sensory bin play, especially with younger children.
* Forgetting the “Quiet” Part: While the bins are designed to promote calm, don’t forget to set clear expectations with your child about the purpose of quiet time. A gentle reminder like, “This is our quiet time for playing with our bins” can be helpful.
Quiet time bins are a journey, not a destination. They’ve brought so much calm and joy to our home, and I’m confident they can do the same for yours. Embrace the process, be flexible, and enjoy those peaceful moments with your little one!
Conclusion
The magic of quiet time bins for 3 year olds truly transforms our days. They offer a sanctuary of independent play and a much-needed break for parents, fostering creativity and focus in our little ones. You can start experiencing this difference today with the simplest step: dedicate a small basket or box to just a few favorite toys, rotating them weekly.
For a different room, consider a “sensory bin” for the kitchen table filled with dried beans and scoops. On a tighter budget, a repurposed shoebox filled with crayons and paper can spark hours of imagination.
We hope this inspires you to create your own pockets of peace and productivity. Dive deeper into more ideas to enrich your home and your family’s routines!